Friday, November 30, 2012

Spiral

Does this count as a string quilt???  It WAS constructed of random width strips sewn round and round.
Obviously it's a work in progress, but if I show it here I might feel like I should keep going.  I have been really bogged down this fall sewing things I needed to sew rather than things I wanted to sew.  That's going to change now!

This is my third spiral.  I was inspired by the quilts of Kristin Miller, a Canadian quilter.  She doesn't have a blog that I know of, but if you are interested, her website is www.kristinmillerquilts.com.


Stars and stripes

I haven't posted on this blog for a very long time, keep forgetting to share my string-y stuff! 

I found a bunch of string blocks in a zip lock bag that wanted to be used for something.  I remember making these blocks when I didn't want to do a specific project but I wanted to sew; then I put them in my "parts department," to be used as when inspiration hit.

I wanted to make a full-size quilt but I didn't have quite enough, so I thought - stars and stripes! I made wonky stars and alternated them with the strings.

I like to add variety by alternating background colors!

My layout looked great, here's the finished quilt:


I had it long-arm quilted by a guild member, Bernerdett - she did a wonderful job!
Stars and Stripes is 82x73 and doesn't have a border; I bound it in a medium-dark blue.

You can see more of the creative process on my blog, just search for "string blocks" to pull up the posts!

Linda


Tuesday, November 27, 2012

Smaller scale diamond strings

This is likely my last finish for the year in the strings department. I have one more string quilt sewn together but not yet quilted. This particular quilt is a pink centred green string quilt. Over all size is 27" by 38" so a baby size. The individual foundations that the strings were sewn on were 5" by 7".
Thanks for setting this blog up it has been a great way to look at what people around the world are doing with their strings. Joanne

Saturday, October 27, 2012

Diamond strings continue to be my favourites

This diamond string quilt was made completely from stash. The diamond centres are a beige with tiny gold stars and the strings are everything I thought might go with brown. So beige, mushroom, gold, a touch of orange and of course light, dark and medium brown. It is a donation quilt for our Scrapbag group.  Joanne

Monday, October 1, 2012

String Tote

I made this tote last week before heading off to my Bible study class. You can read about it on my BLOG. Just scan down a few posts where I've written about the struggles and figuring I had to do.

Thursday, September 13, 2012

Bull's Eye

 
This little quilt is the end of a run of string quilts that were stuck in my head and needed out....LOL
The blocks are one 4 1/2 inches and the quilt measures 42 inches square.....and no, I haven't been able to use up those scraps.....they just seem to multiply....sigh!

Tuesday, September 11, 2012

Our quilt is getting media attention!

Thanks again to all of you for participating in this string quilt.
You may recall we donated it to the Katie Cares Foundation.
Katie's mother Ruth was just on a local radio station being interviewed about the foundation,
and she mentioned an upcoming fundraiser, which includes raffling off our quilt.
For the record, it is the first prize, ahead of a pair of Winnipeg Jets hockey tickets.
She thinks it is beautiful -- and I know all of you do too--
and she's thrilled that 20 quilters from around the world made it.

The website doesn't have many details about the quilt
(check under fundraisers)
but there's a link to our blog on the Katie Cares facebook page.

Check that out, and be proud once again of the effort we all made together.
What started as a bit of a joke to prove that string quilts are beautiful
has grown into into a larger piece of good work that could potentially help many sick kids.

Thanks again!

Anyone want to make another quilt?
Let me know in the comments, and I'll issue another string challenge soon.

Friday, September 7, 2012

The Biggest Quilt Yet!

I've been doing string quilts for about 5 years now and so far this is the biggest quilt yet.  My youngest son recently bought a house and right away I knew he needed a bedspread.  I had plenty of fabrics from various African styled quilts and I wanted to make a string quilt for him.  He wanted it BIG as he doesn't want to contend with a bed skirt and all the "frilly stuff."

I think this quilt is big enough.


His birthday is tomorrow and my youngest turns 35!  Hope he likes it! 

Monday, September 3, 2012

A Diagonal Finish

All done and loving the results!!

Final measurements are
62 by 82 inches. I even managed to miter the piano key border. Yea!

Friday, August 31, 2012

Think Diagonal String

This 9 by 12 inch string is the first of many that I'm sewing up to use of some of those pesky useful scraps.
To see more of my progress, pop over to my blog, Ravelly1.

Monday, August 13, 2012

String borders for my Bento Box

I wanted to stop by today and show you what I've been working on lately.
Here's my version of a Bento Box and the scrappy string border I made.   The border blocks consist of 2" four patches and string blocks that were cut 1" wide.

I have more pictures and info on my blog if you'd  like to stop by and read about my journey and how I came to decide on my final design.

Have a great day.  
LindaKs

Tuesday, August 7, 2012

String-y colourwash quilt sewn together

I've sewn together the string-y colourwash strips
to make a top 48 by 60 inches.
I'm thinking about a lime green border, or not.
Check my blog to see the plans for the pieced back.

Monday, August 6, 2012

Scrappy String Ring Quilt Top Finish

I'm a couple days behind in posting this finish, but here it is.  The string ring (string Dresden) quilt top is done!  

Details and more pics can be found on my blog, here.  

Thanks to String Thing Along for the motivation to keep going with this project, and for the suggestions when I started putting the blocks together to finish it.  It was very helpful, and you all rock!

Saturday, July 28, 2012

Doce meses en rojo.Pollomari

Hola!!

Espero que hayais disfrutado de la inauguración de las Olimpiadas,cuál fue tu parte favorita?La ví  por la tele y disfruté un montón,no quería perder detalle.Mí parte favorita fue cuando llegaron las Mary Poppins y  también el momento James Bond me pareció total..Ha ido alguien de tú ciudad,pueblo?De aquí ha ido la tenista Maria José Martinez,espero que la vaya genial.Ahora a por las medallas,aunque llegar allí ya es un triunfo.


Cambiando de tema,este es el bloque del mes de Julio del sal Doce meses en rojo que organiza Griselda.Este bloque lo ha diseñado Griselda y esta es mi versión:


 y  así quedan los objetivos conseguidos:


Ya falta dos bloques para acabar.Gracias Griselda!!


Y no sé si  habéis visto a un ser dulce  llamado  Pollomari, esta poblando la blogosfera y ha aparecido por aquí.Nuestra amiga Nanny ha sido la creadora,como siempre con un supertutorial para no perdernos y esta es mí versión.Pasad por su blog para ver como va el corral.


Aquí con  su herramienta favorita:


Y como he cumplido el objetivo,Nanny me ha diplomado:


Mira, te gusta? te quieres hacer  uno?


Ya me he apuntado,me encantan los bolsos y este tiene una pinta estupenda.Si quieres hacerte uno con amigas de la blogosfera, pásate por el blog de Bessones, y te anotas.

Aquí os preguntaba cuantas reglas tenéis  y te mostraba las mías.

Espero que pases un gran fin de semana.Hasta pronto y sed felices!!

Friday, July 20, 2012

Still Strung Out

Sorry about the blurry photo, I don't know what's up with that.  So this is what I have so far. Notice the second tan colored star. I planned that.......LOL.  The top measures 32 by 45 inches at this time. Next, I'll add a stopping border. I have a great barbed wire fabric, followed by...... I can't believe I'm about to say this...... piano keys...... SIGH!

Tuesday, July 17, 2012

Strung Out - The Cowboy Way

Just when I thought I'd never get to sew again (family health issues), I found myself out in the old sewing studio with an idea in my head and western fabric spread everywhere. In other words, this quilt is going to have strips of my cowboy/western fabrics in it.  This type of quilt is a great way to get rid of use some of those hard-to-know-what-to-do-with fabrics.
I found some scraps of muslin, an old cardboard folder and started the ball rolling.
First, I made a template from my cardboard. Really, I just cut out an elongated triangle. Then I cut another one about a fourth larger. 

Next, I traced the smaller triangle to one corner of each piece of muslin using a mechanical  which measures 8 1/2 inches square.  This will work with any size you choose. 

Now, with this stage, I had to do a small bit of trial and error. That's the reason I'm pointing to the "BACKSIDE" of the fabric. In order for your elongated triangle to fit properly on the muslin (OMG, did I almost ruin a FQ on this one...LOL) one must..... must cut from the wrong side of the fabric. So there is no mistake of the wrong angle. 
So, if you are going to try this, please take the time to cut all the triangles from the wrong side.

This is how it will look when you're done.
Oooops! I didn't have a photo of the rectangle that I cut before I cut it in half on the diagonal. Sorry, but just imagine those two triangles back together.

Now comes a bit of instant gratification.  
Put a dab of fabric glue on muslin then place fabric triangle right side up over the pencil mark and press to hold in place.

This is a view of 4 blocks, not sewing together by any means, to demonstrate what the quilt is going to look like towards the center of the joined blocks.
My next step will be to give these blocks a little pop by adding the first strip which will be a black 1 1/2 inch strip doing to sew, flip and press method we quilters know so well.
I'm also planning to do a secondary design but that a surprise for later.  In other words, I haven't figured that out yet... LOL
I am so excited to be sewing again.

Monday, July 16, 2012

It's a colour wash!


I've been playing with these colourwash string sets made for me last summer by members of the 15 minute play bee. Originally, I was going to set them with lime green sashing between the strips, which are of varying length, but are all 6 inches wide. They move from orange/pink to blue. If I don't use sashing strips, the quilt will be smaller, but I have lots of lime green for borders. I'd welcome suggestions or ideas on how to put these together.

Tuesday, June 26, 2012

Wanted: Your Opinion

I'm working on my scrappy string ring quilt but have run into a "design opportunity" and have some decisions to make before I sew the top together. 

Care to weigh in?  With your opinion, that is—no scale involved!

Stop on by!

Wednesday, June 20, 2012

Anything Goes on its way to a new home


Last weekend I delivered our group quilt, Anything Goes.
Here my nieces are wrapped in it, demonstrating that it's a warm and cuddly quilt.
They liked the variety of fabrics and the bright colours and the fleece backing.

These two girls will deliver the quilt to the Katie Cares Foundation,
where it will either be passed on to a child with cancer,
or raffled off to make money for the foundation.

Either way, it's doing good.
Thanks to all of you who donated string blocks and demonstrated that anything goes together.


Thursday, June 14, 2012

No sashing and I like it!

flimsy almost done, thinking about a top and bottom border
to make it longer.

Amish Strings Is Finished


Come on over to my blog
to see lots more photos ~

I love string quilts!

Quiltdivajulie

Monday, June 11, 2012

Square scraps


Good morning to you all!

I'd like to show another scrap quilt I made. 
I used 2" squares that I cut from batic strips in different widths.
No borders, just a binding.


(Sorry for the blurry picture; I miss(ed) my steady right hand... )


This one was made using that special foundation fabric.
I made it from 4 cm. squares.


*******


Wishing you all a wonderful day!
Cheers!

*******

Sashing or no sashing?

I've had these strips sewn together for several years,
but I've stalled on the sashing.
At first I was going to make this a more traditional Chinese coins quilt
but now after playing with strings with all of you,
I'm wondering whta you think of a less orderly approach.
Here they are laid out side by side without the coins matching up.
I'm also thinking of inserting pinwheels or some other feature randomly.

Thursday, June 7, 2012

Copy Cat!

I loved the round table mats with the rick rack trim that P. showed off a couple of weeks ago.  I just put the finishing touches on two of my own this morning:
She has great tutorial on her blog "The Way I Sew It".
Many thanks to all the bloggers that share so many ideas! 

Wednesday, June 6, 2012

String links

I added Anything Goes
to a string linky party over here.
Take alook at all the great string quilts there.

Sunday, June 3, 2012

String quilt finished.

Good morning / afternoon / evening to you all!

I thought you might like to see my finished string quilt.
Here are some picures.
The backing is a nice cotton children's curtain fabric, 
which was designed for War Child and got the name 'Save the Children', as the label shows.


 I used a scrap of the backing fabric, the selvage on, for the label.

It's got a place on the wall over the settee in my livingroom and I am very happy with it!

*******


Wishing you all a wonderful Sunday.
Cheers!
 

Thursday, May 31, 2012

simple is Good

Thanks for inviting me to share my recent string project!  I'm Rachel, reposting from my blog, Stitched in Color.  Hope you can stop by some time!

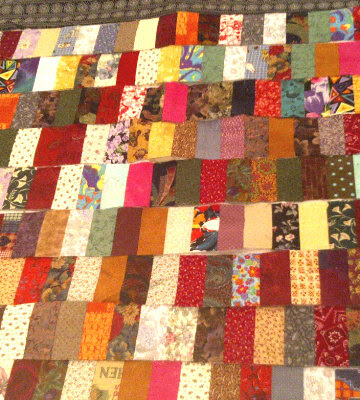
Once upon a time, I pinned this lovely image to my Patchwork Pinterest board.  My exact comments,  "easy is good."

by Cassandra Ellis

Whenever I develop a class, I really stretch myself in the process.  I want to create projects that are fresh, useful, but not too hard.  I must try new things, things that don't always work.  It's exciting and exhausting.

Maybe that's why I was struck with the desire to make this quilt while visiting a friend in her new nest.  She hadn't had the time or energy to do much decorating and I noticed she had only sheets on the two beds that stood in a sunny, large children's room.  This quilt by Cassandra Ellis really looks like my friend as well.  Bethany is loyal to neutrals, a fan of simple, with a style that exudes good old-fashioned purity.  Here's an example of when being "original" was not even the point.  I set out to make a quilt just like Cassandra's, but in colors to suite Bethany's children.  Easy and good.

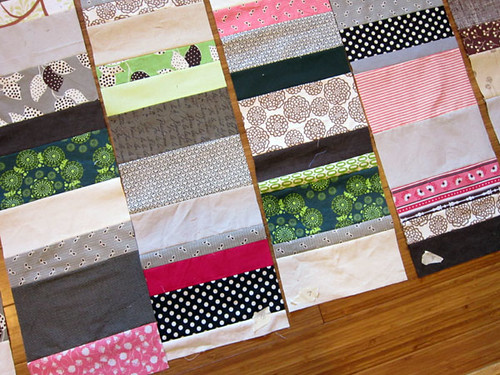
One thing I love about this design is how it contrasts random and order.  The strips of "stacked coins" that reach across the quilt, are all neatly aligned with a standard length, but within the strips the width of the coins varies dramatically.  This also means you can use scraps of various sizes, rather than having to trim away (waste away) fabric to fit a particular dimension.

piecing and listening

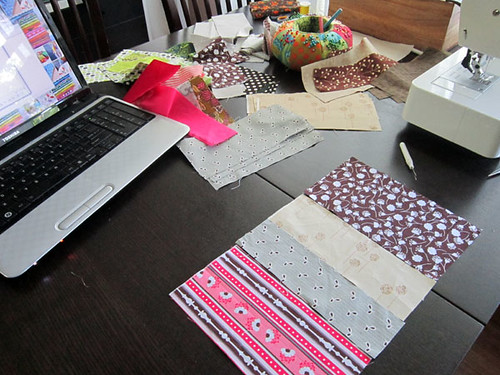
I decided to cut my scraps 9" long in widths varying from 1.5" to 6".  As I pieced them together, I noticed that I preferred to use the thin strings sparingly to keep the quilt from being too busy.  I cut up all of my neutral string scraps and large scraps in blacks, browns, whites and grays.  For Lucy's quilt I added peachy pinks, bright pink, soft pink, lime green, pale green and dark green.  After some piecing, I made sure to use plenty of Kona solids rather than so many prints to give the eye places to rest.  And, I did have to keep reminding myself that this quilt was to have lots of neutrals.  My ratio of neutral to colored strips is about 4:1.

warm Flea Market Fancy grays

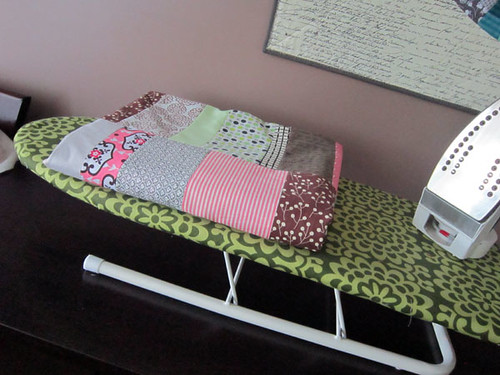
After piecing the strings into long rows, it was time to trim the rows to 60" long (Bethany asked for twin quilts measuring 60" x 96").  I had cut my strings 9" wide with the intention of trimming them to 8.5" wide after piecing.  This approach allowed me to piece without stressing if row edges were sewing in perfectly aligned.  Stacking so many strings together inevitably causes edges to shift here and there. Trimming to perfection makes for relaxing sewing!

trimming up

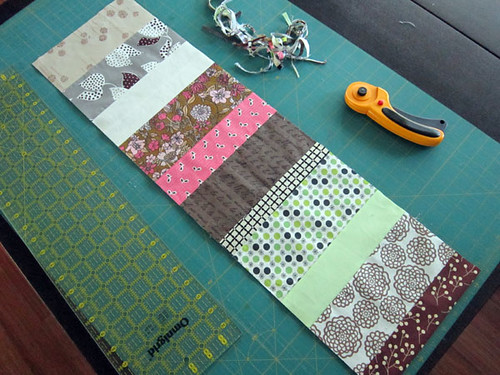
To trim, I folded the strips in half, matched the fold to the bottom of my cutting mat and cut the length of the strip to 30" for 60" long unfolded.  I took a 1/4" or so off each side of the strip to finish them at 8.5" wide.

tagging strips

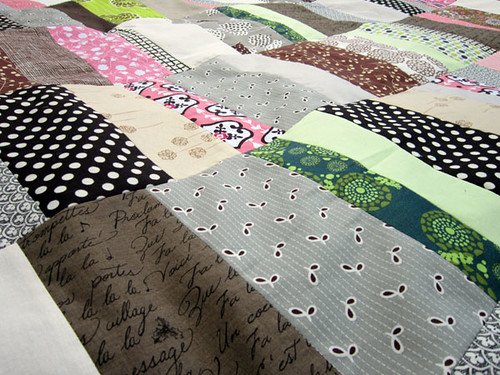
Once all (12) 8.5" x 60" strips were pieced and trimmed, I arranged them on the floor.  Then I flipped and shuffled strips until the most eye-catching prints (like the black dot and bright lime floral) were evenly distributed.  To save the strip order without having to leave them spread out on my floor, I used masking tape to stick numbers right on each strip!

Simple for Lucy

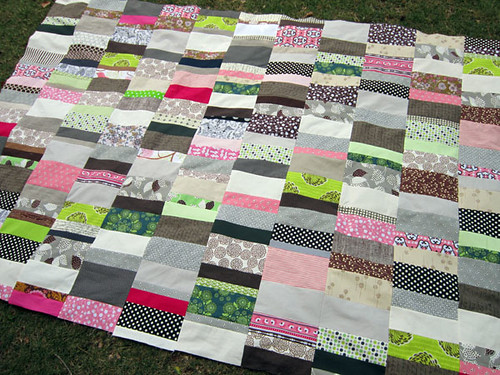
Then just 11 loooooong seams later, I had a quilt top!

lots of neutrals

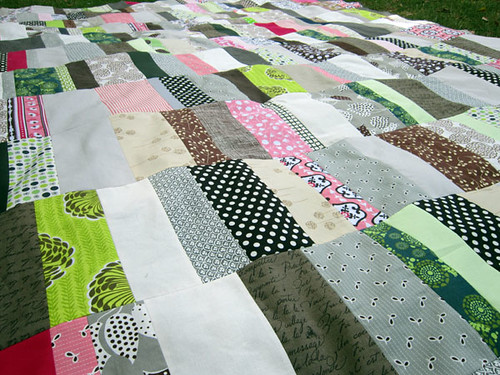
This quilt design is one I can heartily recommend to anyone.  It's a great choice for your first quilt or a fast, easy way to eat through those string scraps.  I'd love to see a rainbow scrap version!  Or, a monochromatic rendering would be lovely!

waiting...

My quilt is now patiently waiting a backing.  I can't bring myself to piece together prints from my stash for the back, since they would probably never see the light of day on the back of a bed quilt.  I'm going to order something in this case.  Hopefully, it'll be linen!